
Ski & Splitboard Touring Gear Guide: Expert Advice for NZ

Backcountry Touring Readiness
- 🎿 Skis: All-mountain (95-110mm waist) with Tech/Pin bindings.
- 🏂 Splitboards: Essential to use dedicated splitboard crampons.
- 🛡️ Safety: Digital 3-antenna transceiver, 2-3m probe, and a metal shovel.
- 🎒 Pack: 35-45L with a dedicated avalanche tool compartment.
Ski and Splitboard Touring Boots
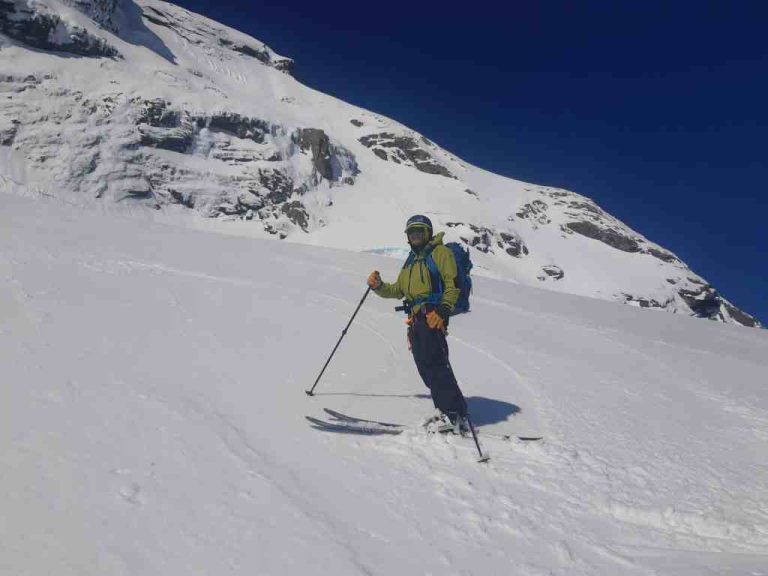
Good ski boots are perhaps the most important item of equipment for ski touring. Ill-fitting, uncomfortable, or heavy boots are the most common trip spoiler we see. The boot is also the direct interface with your skis, without a good fit you will not get the optimum performance and enjoyment from them. Your regular downhill ski boots that are used on a ski field can be used for touring. However dedicated modern Alpine Touring boots are significantly lighter, with a great degree of movement for uphill travel, and nowadays offer similar ski performance to downhill boots.
Every foot is different so it is worthwhile visiting a professional boot fitter before buying any boots and different brands suit different sizes of feet. Similarly, the factory insole is unlikely to give you the best performance. If your feet are relatively normal, an off-the-shelf insole will improve comfort and for the more atypical shaped feet, a custom made insole is a very worthwhile investment. In W’naka, we visit Sole Lab for all our boot fitting requirements.

Regular freestyle or free-ride snowboard boots are fine for touring with snowshoes or splitboards. For more technical mountaineering objectives, dedicated snowboard mountaineering boots are preferred. These offer a stiffer sole with heal welts for compatibility with boot crampons and better edging when boot packing in firm snow. Also a slight rear flex for more comfortable uphill travel and a rand for protecting the longevity of the boots. Check out brands like Fitwell’. More dedicated splitboarders also use lightweight ski boots combined with bespoke splitboard bindings.
Choosing Alpine Touring (AT) Skis and Bindings
Traditional frame bindings are generally cheaper but don't come close to matching 'Tech' or pin bindings for reliability, performance, and, most significantly, weight. Tech bindings might take a bit of getting used to but once mastered, they are simple to use. Hybrid bindings, such as the Salomon Shift, now offer a crossover option. These are DIN certified with the release reliability of standard downhill alpine bindings whilst offering the uphill performance of pin bindings. There are compromises however in weight and ease of use but allow a one ski quiver for both ski field and backcountry.
With modern, lightweight, AT boots and bindings you can easily get away with a well-performing and potentially slightly heavier ski. The lightest touring-specific skis don't have the waist width or tip and tail stiffness to perform well in variable snow conditions and are best suited to 'skimo' racing. An all-mountain ski with an intermediate waist width (95-110 mm) works well in NZ.
| Category | Recommended Spec | NZ Specific Guide Advice |
|---|---|---|
| AT Skis | 95mm – 110mm waist width | Avoid ultra-light 'skimo' skis; you need stiffness for variable NZ snow. |
| Bindings | Tech (Pin) or Hybrid (eg. Shift) | Pin bindings offer the best uphill performance for long NZ approaches. |
| Skins | Mohair/Nylon Mix | The best balance of glide and durability. Always carry skin wax. |
| Crampons | Ski/Splitboard specific | Mandatory. Essential for firm morning crusts and glaciers. |
| Poles | Collapsible (3-section) | Must fit inside the pack for splitboarders during the descent. |
Splitboards
Splitboard technology has developed rapidly over the last few years and is now a reasonable method of backcountry travel. Modern splitboards will perform similarly to normal snowboards downhill but can be split in two to go uphill similar to being on skis. The most popular splitboard bindings are Spark R&D or Karakoram. There are a few more parts to a splitboard binding so they can also be prone to icing. Having a tool handy for getting rid of ice buildup helps. At first, reconfiguring between downhill and uphill mode can be time consuming so some practice is useful before heading out on longer trips.
Limited hire splitboard equipment is available in Wanaka and needs to be arranged in advance. You can hire equipment from MT Outdoors in Wanaka, Snowboard Workshop in Queenstown, or couriered from SplitN2 in Christchurch.
Snowshoes
Although snowshoes are a cheap and easy way to get into backcountry touring, they are much less efficient than using splitboard or AT ski gear. Snowshoes are best suited to flatter terrain, so not the typical terrain that skiers and snowboarders aspire to travel to. Snowshoe travel in very soft or firmer snow conditions or steeper slopes will be much more tiring and uncomfortable.
Ski and Splitboard Crampons
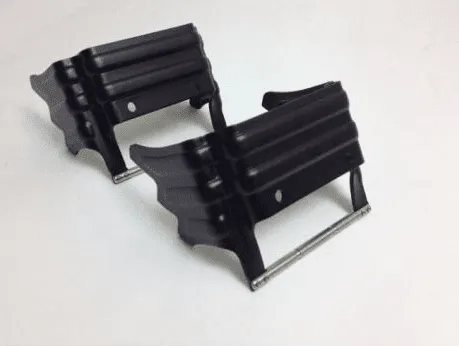
Snowboard boots do not offer much lateral ankle support and splitboards do not have the stiffness, length, or edging ability of skis. This limits splitboarders' edging in firm or icy conditions, possible at any point in NZ during winter. Splitboard crampons are therefore essential equipment for all trips. If hiring ski and splitboard touring equipment, make sure that you have ski or splitboard crampons as these are highly specific to the binding so difficult to source last minute.
Ski crampons improve the security of AT skis in firm conditions and are highly recommended throughout winter. They are also essential for glacier or spring (late August onwards) touring trips. Ski crampons are similarly specific to bindings types and models.
An ice axe and boot crampons can also be useful additions to the touring kit. Particularly after there has been rain on the snowpack followed by cold temperatures during winter, or in spring when solar-facing slopes have received a number of melt-freeze cycles and become firm and icy in the morning,
Touring Skins
For traction uphill whilst touring, skins are stuck to the bases of the skis or splitboard. These allow sliding movement in one direction but grip in the other. Traditionally made from seal skin, they are now made from nylon, mohair, or a mix. Nylon is cheaper and last longer but has a less efficient glide than mohair. This makes the mix a good compromise. Most skin brands either come pre-cut for a particular ski or come with a cutting tool that makes it easy to trim to your skis yourself.
Skins can either adhere to the base of the ski with skin glue or a self-adhesive system. Glue is very reliable but easy to get contaminated by dirt and debris. Over time, this can affect their stickiness so require periodic cleaning and even reapplying of glue. Self-adhesive skins are easier to handle and maintain. Without the sticky glue, they can be stored more easily rolled up in your rucksack or in a pocket of your jacket. However, they do need to be looked after whilst on the go as excessive moisture or cold dry snow on the self-adhesive face can stop them from sticking to the skin bases.
Skin maintenance
You should always dry your skins out after use and keep them in a cool dry place during warm summer weather (even the freezer). This stops the glue from gunking up. Experienced tourers often prefer to store them in jacket pockets when going uphill as it helps them to dry out a little and avoids getting the backpack off, saving time during transitions. The skin saver sheet that most skins come with is best left at home as it's just another thing to manage in cold or windy conditions. Good maintenance is essential for the long life of the skins. A great tip is to always have some skin or candle wax in your repair kit. Especially during spring, soft, warm snow can start sticking to the underside of your skins, halting progress. This usually happens near the end of the day when already energy levels are low.
Poles
For ski tourers, any ski pole will do but is nice not to be too heavy. For splitboard touring, poles need to be telescopic or collapsable so they will fit into your backpack when travelling downhill. Avoid stowing poles (or anything) on the outside of your pack where they can easily be lost. Telescopic poles can get iced up. 3 section collapsable poles tend to break down smaller for the best fit inside a pack. On traverses, splitboarders will often keep out a pole for assistance.
Helmet

There are now many lightweight helmets available for touring so are becoming a standard piece of equipment. Dedicated 'alpine' or downhill ski helmets are often too warm for wearing uphill so need to be carried in or on your pack. Many helmets now come with a ski touring rating or are dual-rated for ski touring, climbing, and mountaineering. Purely climbing rated helmets are designed to deflect falling ice and rocks from above. Although better than nothing, they do not provide the same level of side protection as skiing helmets.
Avalanche Safety Equipment
Avalanche safety equipment is essential for ski and splitboard touring. All modern digital 3-antenna transceivers operate on the same frequency. It is important to become familiar with and regularly practice with your own device. Marking functions are useful for complex rescue scenarios but a lot has gone wrong if you are having to use it for real.
You should wear your Transceiver in a chest harness under outer layers or a zipped pant pocket. They should also be separated at least 20cm for electronic devices as they can cause interference. Transmitting devices must be in flight mode.
A 2 to 3 metre probes are most commonly used for the depth of snowpack usually encountered in NZ. Practice taking it out of your pack (leaving any sleeve inside the pack or at home), deploying downhill AND locking. Many an avalanche rescue practice has been slowed down by a floppy probe.
Shovels must be strong and durable in order to be effective for digging. Telescopic handles offer significantly better performance digging in hard snow or avalanche debris. You will notice a big difference in digging with lightweight models or shorter handled models. Make sure your companions have a solid shovel. Digging can be the most time consuming part of an avalanche rescue and you want to give them the best chance of getting YOU out.
Backpack
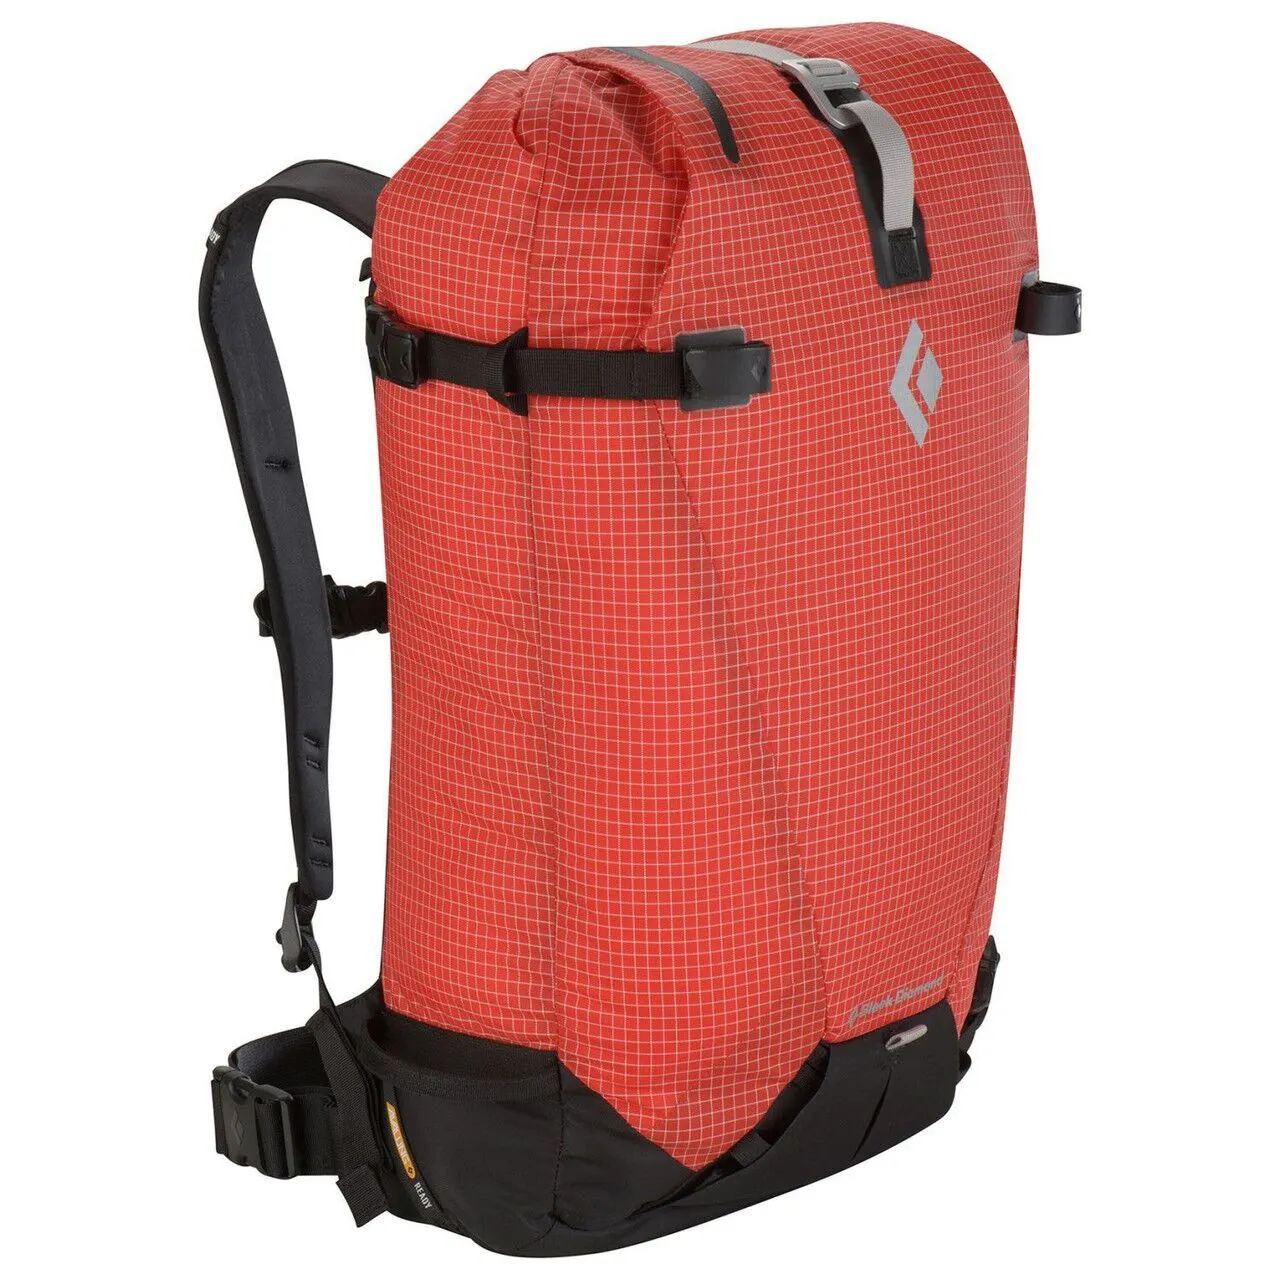
Finally, you'll need something to put all your equipment in. A dedicated touring pack with a separate avalanche tools pocket is worth the investment. This allows for good organisation and to keeps the main contents of the pack dry. Other useful features are ice axe attachments and helmet pouches.
Small day packs won't do. You'll need space for touring essentials including map, compass, first aid kit, emergency shelter, emergency communications device, goggles, sunglasses, suncream, head torch, food, and water. A Buff’ style neck gaiter is a useful item for keeping warm, keeping out drafts, and sun protection on glaciers. Even in winter, the sun can be strong. A baseball-style cap is useful for uphill travel.
Ready to Head Beyond the Gates?
Gear is only the first step. Knowing how to use it safely in avalanche terrain is what matters most. Join us for a hands-on course to master your equipment and mountain craft.
Touring Equipment FAQs
Can I use my resort ski boots for touring?
While possible, standard downhill boots are heavy and lack the "walk mode" range of motion required for efficient climbing. Modern AT boots are lighter and now offer comparable downhill performance.
Do I really need ski or splitboard crampons?
Yes. In New Zealand, morning snow is often "bulletproof" ice. Skins alone will slip on frozen glacier surfaces; specific crampons provide the necessary security for side-hilling and steep ascents.
Why is a dedicated touring backpack better than a standard daypack?
A dedicated pack features a "wet" pocket for your avalanche shovel and probe. This ensures your tools are accessible in seconds and keeps your dry clothing separate from snowy safety gear.
How should I store my skins during a trip?
On the go, store skins in an internal jacket pocket. Your body heat keeps the glue tacky and helps them dry slightly, ensuring they stick for multiple transitions throughout the day.
Frequently Asked Questions
Can I use my resort ski boots for touring?
While possible, standard downhill boots are heavy and lack the "walk mode" range of motion required for efficient climbing. Modern AT boots are lighter and now offer comparable downhill performance.
Do I really need ski or splitboard crampons?
Yes. In New Zealand, you can often come across wind stripped ridges, rain or sun affected snow which can present a firm surface. Although skiers may be able to get traction with the ski edges, this is not always possible in softer snowboard boots and splitboards so splitboard crampons are mandatory pieces of equipment.
Why is a dedicated touring backpack better than a standard daypack?
A dedicated pack features a "wet" pocket for your avalanche shovel and probe. This ensures your tools are accessible in seconds and keeps your dry clothing separate from snowy safety gear.
How should I store my skins during a trip?
On the go, store skins in an internal jacket pocket. Your body heat keeps the glue tacky and helps them dry slightly, ensuring they stick for multiple transitions throughout the day. Cheat sheets are useful for storage and drying but can be left at home.